

.JPG)


HST - 8 at a Time
I
make 8 HST at a time using this method that you've probably
seen before, so this will be a refresher for some of you.
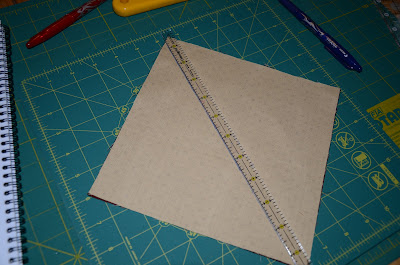
Begin with two
squares, in this case I'm beginning with (2) 8" x 8" squares.

Place
RIGHT sides together.

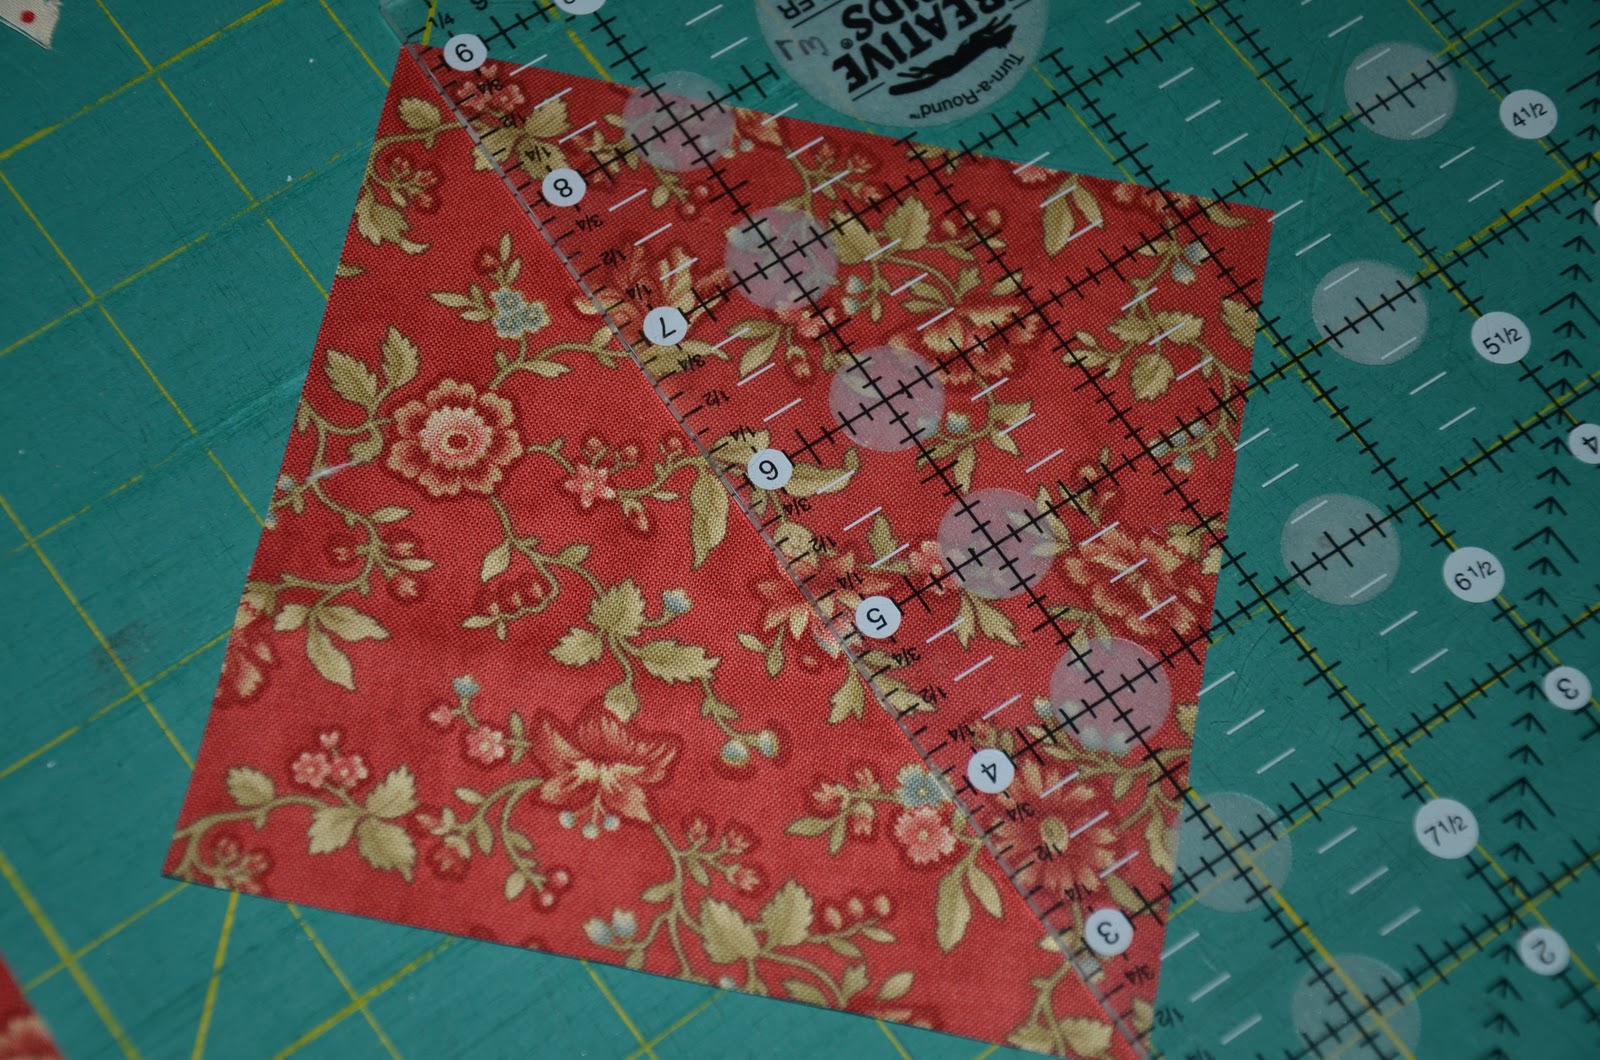
I use an OMNIGRID 1/4"
ruler and I then draw a line on each side of the ruler from corner to
corner.
Then do the same
procedure on the other corner. I use a Frixion pen for marking because I like
the nice sharp point and it disappears as soon as the iron touches the marked
fabric.

Your square will look
like this.....ready for you to sew.......

....exactly on each of
the lines....well as exactly as you can!

Then, use a ruler and
your first cut will be down the center, vertically exactly through the
intersection of the stitching lines.

Your second cut will
be horizontally through the intersection of the stitching lines.

Then you will have
this.

Now, cut diagonally
through each of the little squares.

Press each HST with
the seam toward the darker fabric. Then, I used my Bloc-Loc
ruler, (the best quilting tool known to quilters) and square it to the size you
want. In this case, I'm squaring it to 3-1/2" x 3-1/2". If you don't have a
Bloc-Loc ruler, a regular ruler will work.

I have very little
waste, and 8 perfect 3-1/2" HST in no time at all.

HANDY DANDY CUTTING CHART - Begin by
cutting 2 squares - one dark, one light
CUT TRIM TO
Unfinished HST
8" x 8" = 3-1/2" x
3-1/2"
7" x 7" = 3" x
3"
6" x 6" = 2-1/2" x
2-1/2"
5" x 5" = 2" x
2"
4" x 4" = 1-1/2" x
1-1/2"
3-1/2" x 3-1/2" = 1-1/4" x
1-1/4"
3" x 3" = 1" x
1"
If you want to go any smaller than this, then you
are crazier than me! I've tried many other methods and I prefer this method
until a new one comes along. I like the fact that I get 8 at a time. Let's face
it, when you make HST, you are usually making them in large amounts. It is
quick, easy and EXACTLY the size I want for precision quilting.
----------------------------------------------------------------------------------------------------
Double Flying Geese - 4 at a time
Here are the cutting directions to make (4) 2" x 3-1/2" unfinished flying geese. When your project is completed, they will measure 1-1/2" x 3" finished.
First, start by cutting:
(1) 4-1/2" x 4-1/2" square from a dark fabric. In this case it is the red
(4) 2-1/2" x 2-1/2" squares from a medium fabric. In this case it is the green
(8) 2" x 2" squares from a light fabric

Place (2) 2-1/2" x 2-1/2" squares, on top of the red square right side together. Using a 1/4" Omnigrid ruler, draw a line on each side of the ruler.

Stitch directly on the marked line.

Cut between the lines.

Press toward the smaller triangles.

Place another 2-1/2" square on the unit. Draw lines on each side of the ruler and stitch directly on the lines.

Cut between the lines.

Press toward the smaller triangle.

Using a Bloc-Loc ruler (or regular ruler) trim to 2" x 3-1/2". The Bloc-Loc ruler assures absolute accuracy.

Now, place (1) light 2" x 2" square on the trimmed flying geese. Draw a line, diagonally from corner to corner and stitch directly on the line NOT 1/4" from the line.

Trim 1/4" away from the stitched line.

Press toward the small triangle.

Repeat procedure on the other side. Mark, stitch and trim.

Press toward the small triangle. Continue with the remaining three geese, and before you know it, four will be completed in no time.
 Compare the two pictures, and you can tell the difference the value of the color makes in the two pictures. Using a darker medium changes the overall look of the geese.


Give them a try. They are fun and easy to make.
I
make 8 HST at a time using this method that you've probably
seen before, so this will be a refresher for some of you.
Begin with two
squares, in this case I'm beginning with (2) 8" x 8" squares.

Place RIGHT sides together.

I use an OMNIGRID 1/4" ruler and I then draw a line on each side of the ruler from corner to corner.

Then do the same procedure on the other corner. I use a Frixion pen for marking because I like the nice sharp point and it disappears as soon as the iron touches the marked fabric.

Your square will look
like this.....ready for you to sew.......

....exactly on each of the lines....well as exactly as you can!

Then, use a ruler and
your first cut will be down the center, vertically exactly through the
intersection of the stitching lines.

Your second cut will be horizontally through the intersection of the stitching lines.

Then you will have this.

Now, cut diagonally through each of the little squares.

Press each HST with the seam toward the darker fabric. Then, I used my Bloc-Loc ruler, (the best quilting tool known to quilters) and square it to the size you want. In this case, I'm squaring it to 3-1/2" x 3-1/2". If you don't have a Bloc-Loc ruler, a regular ruler will work.

I have very little waste, and 8 perfect 3-1/2" HST in no time at all.

HANDY DANDY CUTTING CHART - Begin by
cutting 2 squares - one dark, one light
CUT TRIM TO
Unfinished HST
8" x 8" = 3-1/2" x
3-1/2"
7" x 7" = 3" x
3"
6" x 6" = 2-1/2" x
2-1/2"
5" x 5" = 2" x
2"
4" x 4" = 1-1/2" x
1-1/2"
3-1/2" x 3-1/2" = 1-1/4" x
1-1/4"
3" x 3" = 1" x
1"
If you want to go any smaller than this, then you
are crazier than me! I've tried many other methods and I prefer this method
until a new one comes along. I like the fact that I get 8 at a time. Let's face
it, when you make HST, you are usually making them in large amounts. It is
quick, easy and EXACTLY the size I want for precision quilting.
----------------------------------------------------------------------------------------------------


Flying Geese Four at a Time
Hello Everyone,
I told the girls the other day in
class that I would post a tutorial for flying geese using a Bloc Loc
ruler. If you are going to invest in any new quilting toys, a set of Bloc Loc
flying geese rulers should be on your "gotta have it" list.
The following
directions make (4) 2" x 4" flying geese (finished size)
Start by cutting (1) 5-1/2" x 5-1/2" light square
and (4) 3" x 3" dark squares.

Using a
quarter inch ruler, draw 2 lines on the back of each of the squares and place
two squares on top of the light square with right sides together. The blocks
will overlap in the middle.

Stitch
precisely on each line.

Cut
between your stitching lines.
 Press toward the
smaller squares and you will get this.
Press toward the
smaller squares and you will get this.

Take your
remaining two squares and place on top of the unit, draw two lines, and stitch
on each line.

Cut between
the two lines and you get this.

Again, press
toward the smaller square and you will have four flying geese ready for trimming
with the Bloc Loc ruler.

The ruler
locks into the seam and there is absolutely no slipping. Using a rotary cutter,
trim around all four sides of the geese.

Before you
can say, "Bob's your Uncle." You have four perfect geese!

Now
remember, if you are working with directional fabric, lay the geese out
correctly so you won't have some flying one way and some flying another. Or if
you don't care which way the wind blows, then it just doesn't matter!
 My quilting is more
accurate now than it ever was once I started using these rulers. Put them on
your Christmas wish list.....you'll be glad you did!
My quilting is more
accurate now than it ever was once I started using these rulers. Put them on
your Christmas wish list.....you'll be glad you did!
I told the girls the other day in class that I would post a tutorial for flying geese using a Bloc Loc ruler. If you are going to invest in any new quilting toys, a set of Bloc Loc flying geese rulers should be on your "gotta have it" list.
The following directions make (4) 2" x 4" flying geese (finished size)
Start by cutting (1) 5-1/2" x 5-1/2" light square and (4) 3" x 3" dark squares.


Stitch precisely on each line.


Cut between the two lines and you get this.

Again, press toward the smaller square and you will have four flying geese ready for trimming with the Bloc Loc ruler.

The ruler locks into the seam and there is absolutely no slipping. Using a rotary cutter, trim around all four sides of the geese.

Before you can say, "Bob's your Uncle." You have four perfect geese!

Now remember, if you are working with directional fabric, lay the geese out correctly so you won't have some flying one way and some flying another. Or if you don't care which way the wind blows, then it just doesn't matter!

Flower Tutorial
I received several emails and
comments requesting a tutorial for the little flowers the ladies made in the
Party in the Garden class. Isn't it sweet!

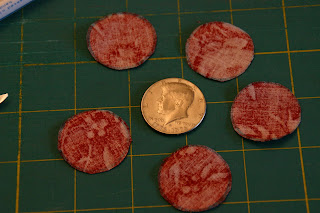
For a flower
the size of a half-dollar, start with a half-dollar

With a
marking pen or pencil, trace around the half-dollar on the wrong side of your
fabric.

Trace around
the half-dollar five time and very carefully cut the circles out along the
marked line. These are your petals.
Fold in half
and press.

Fold in half
again and press.

Make a
running stitch along the bottom of the raw edge. DO NOT CUT OR KNOT YOUR THREAD
YET.

Continue on
with a running stitch with petal numbers 2 thru 5.

The petals
are now all joined together and look like little dunce caps!

Gently, but
firmly, pull the thread and gather the petals around in a circle.

This is
where you need an extra set of hands. I used an applique board and pinned the
last petal to the board while making a knot or two. Then sew the end of petal
#1 to petal #5 with a couple of stitches. (Sorry, I forgot to take a
picture.)

Now for the
center. Use a dime-sized plastic template or a dime. Trace around with a
marking pen, a generous 1/4" and cut along the marked line. (By the way, this
is how I make all of my circles for berries or flowers for all of my applique
projects.)
 Make a running
stitch.
Make a running
stitch.
 Pull your
thread.
Pull your
thread.

Iron the
section, then remove your template or dime. Don't worry about removing the
template. Since the section was pressed, the fabric will have a memory and know
where it is supposed to stay. If the section seems to be a little "loose", just
tighten up the thread.

Now tie
your knot and iron it again.....with steam, lots of steam.

At this
point, I glued the center section to the flower petals, making sure no raw edges
were visible.

The
flower is ready to be used as an embellishment. Attach the flower by sewing
around the center section with a blind applique stitch. To make it even more
secure, use a button in the center. You have endless possibilities.

Coin
size, determines flower size. If you are so inclined, make little, itty bitty
flowers by using a quarter. Let me know if any of you make a dime-sized
flower.....this, I gotta see! I was quite pleased with the half-dollar
flower.

So there you
go....total cuteness! These little flowers that will add charm to any
project.

For a flower the size of a half-dollar, start with a half-dollar

With a marking pen or pencil, trace around the half-dollar on the wrong side of your fabric.

Trace around the half-dollar five time and very carefully cut the circles out along the marked line. These are your petals.

Fold in half and press.

Fold in half again and press.

Make a running stitch along the bottom of the raw edge. DO NOT CUT OR KNOT YOUR THREAD YET.

Continue on with a running stitch with petal numbers 2 thru 5.

The petals are now all joined together and look like little dunce caps!

Gently, but firmly, pull the thread and gather the petals around in a circle.

This is where you need an extra set of hands. I used an applique board and pinned the last petal to the board while making a knot or two. Then sew the end of petal #1 to petal #5 with a couple of stitches. (Sorry, I forgot to take a picture.)

Now for the center. Use a dime-sized plastic template or a dime. Trace around with a marking pen, a generous 1/4" and cut along the marked line. (By the way, this is how I make all of my circles for berries or flowers for all of my applique projects.)


Iron the section, then remove your template or dime. Don't worry about removing the template. Since the section was pressed, the fabric will have a memory and know where it is supposed to stay. If the section seems to be a little "loose", just tighten up the thread.

Now tie your knot and iron it again.....with steam, lots of steam.

At this point, I glued the center section to the flower petals, making sure no raw edges were visible.

 |

So there you
go....total cuteness! These little flowers that will add charm to any
project.
Basket Tutorial
Hello Everyone,
I've been asked by some of the ladies who signed up for my Party in the Garden BOM through ThimbleCreek for a basket tutorial. So here you go! This little basket is going to be in each corner of my new Buttonwood pattern too. Since I'm a multi-tasker, I'm killing two birds with one stone. I'll make a basket for the new design, while fulfilling the wishes for a tutorial.
I've been asked by some of the ladies who signed up for my Party in the Garden BOM through ThimbleCreek for a basket tutorial. So here you go! This little basket is going to be in each corner of my new Buttonwood pattern too. Since I'm a multi-tasker, I'm killing two birds with one stone. I'll make a basket for the new design, while fulfilling the wishes for a tutorial.
Here's the end result, a 6-1/2" unfinished, cute little basket.

The following series of pictures addresses how to make the basket handle. Once the handle is made, the rest of the block is a piece of cake. Just take your time and accurate cutting is absolutely essential.
Start with (2) 3" x 3" blocks cut from background fabric and (2) 3" x 3" blocks from the contrasting fabric.

With right sides together, using a quarter inch ruler, mark each of the blocks like this. Stitch along the marked lines.

Line a ruler up at the 1-1/2" vertical mark, which should perfectly intersect the center of the block, hold your breath and cut.

Line up the ruler at 1-1/2" horizontal mark, and cut again.

Now you have eight sections like this.

Cut between the stitching lines.

You will have a total of 16 half-square triangles. You will only need 12, but save the extra four for another basket.

Press toward the darker fabric.

Trim each of the 12 HST (half-square triangles) to exactly 1". With a Bloc Loc ruler, you can just slide it from one side to the other for easy trimming.


You will have 12 perfect 1" HST.

Next from background fabric, cut (1) 1-3/8" square and cut it in half diagonally. This is for the end of the handle.

From the background fabric, cut (1) 3-7/8" x 3-7/8" square for the basket top. Cut it in half diagonally. Save the extra side if you wish to make another basket.

Place each of the above pieces like this. Stitch the HST together in groups of two. Press each section carefully so you don't stretch them out of shape. Press the seams toward the top of the basket handle. This is important! Finish stitching all of the HST together.

It should look like this. Then sew the triangles to the bottom of the HST strip and press this seam toward the triangle.

Almost done with the handle.

Cut (3) 1" x 1" squares of contrasting fabric for the top of the handle.

Stitch one square to the HST strip. Press toward the 1" square.

Sew left HST strip to the basket background. Have your stitching intersect the previous stitches and you will not loose any points in the handle.

Press toward the large triangle.

Stitch right HST strip to the other side. Press toward the large triangle.

The hardest part is now over!

Cut (1) 4-7/8" x 4-7/8" square and cut in half diagonally.
A flange is optional here. Cut (1) 1" x 10" strip of flange material, fold it in half with wrong sides together and press. Be careful not to stretch the flange. Stitch it to the basket bottom a scant 1/8" along the raw edges.

Attach top of the basket to the bottom. Always trim the little dog ears off. Press flange down and back seam up.

For basket base, cut (1) 1-7/8" x 1-7/8" square and cut it in half diagonally.

It goes here.

For the remaining pieces, cut (2) 1-1/2" x 5-1/2" rectangles for top and (2) 1-1/2" x 3-1/2" rectangles for sides. Cut (1) 2-7/8" x 2-7/8" square and cut in half diagonally for bottom base.

Your block should look like this.

From background, cut (2) 1" x 1" square and place at the top of the basket. Make a four-patch section from the four squares.

Sew basket base triangles to 1-1/2" x 3-1/2" rectangles. Press toward the dark triangle base. Then stitch to basket sides.

Stitch the left long rectangle to the basket. Press toward the rectangle Sew the four patch at the top of the basket to the 1-1/2" x 5-1/2" rectangle. Press toward the rectangle. Stitch the bottom triangle to the basket base.

You are finished, an almost perfect 6-1/2" basket block is your reward.

No points were lost in the making of this basket! Well, almost no points.

Have a great weekend everyone. I have three more little baskets to make for Buttonwood, then I can put it all together!
As always,
Lynn
Your tutorials are fantastic. Thank you for all the time I'm sure you had to spend doing them. The directions are clear and easy to follow and the pictures are really helpful.
ReplyDeleteAmazing tutes! Thank you so much for sharing your time and talent. Sew easy to understand... excellent!
ReplyDeleteSo great tutorials here! Thank you so much for sharing :)
ReplyDeleteExcelente! Obrigada por compartilhar!
ReplyDeleteCongratulations!! They're very useful, thanls a lot for sahring!!
ReplyDeleteMaite.
So glad to stumble along on this tutorial on pintrest.
ReplyDeleteThanks for sharing!
Great tutorial for the small triangles. Thanks.
ReplyDeleteLove the tutorials and your u-tube videos, was wondering where the PDF files are that you mention in the videos might be. Also where your book is sold? Thanks for all the clear and precise info.
ReplyDeleteThank you Lynn!
ReplyDeleteI admire your quilts! Making all these beautiful blocks seemed not for me, but thanks to your wonderful tutes I will do it !!
Thank you for your work, which you spend on teaching us.
Greetings from Poland
You are always so helpful, Lynn! Love the little flowers...I may have to try it sometime!
ReplyDeleteI just found your blog and shop, i have been to In Between Stitches several times but only once since they moved. I so love your Christmas Ribbon pattern in progress. I cant wait to purchase it when it goes up for sale. Your virtual tutorials are very detailed and easy to understand. You have a new follower. Thank you
ReplyDeleteI used your book to make 4 flying geese for a quilt that used a geese on four sides with directional fabric. All the geese fabric needed to flying in the right direction. Yay
ReplyDeleteThank you for your tutorials ! It's so nice people helping People.
ReplyDelete