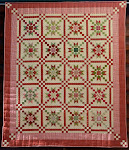
This tutorial is the 3rd and last one in the series for Lil' Orphan Scrappy. The tutorial will cover the final border and how to put the quilt together.
Begin by cutting (26) 5-1/4" x 5-1/4" light squares and (26) 5-1/4" x 5-1/4" dark squares.
Place the squares right sides together.
© I use a small
Omnigrid™ ruler that has a centerline ¼” from both sides of the ruler. Place the ruler diagonally on the wrong side of the light fabric and draw
a faint line on each side of the
ruler using a marking pencil or quilting chalk. Make sure it is a very thin line.
Stitch directly on the lines. Cut them apart between the stitching lines. Open, and then press seams toward the dark fabric for half of the HST. Press the other half toward the light. You will have (2) half-square triangles. I used a Bloc-Loc ruler and trimmed the HST to 4-3/4" x 4-3/4".
Sew the HST together in groups of two and mix the colors together. Since you pressed half of the HST's to the dark, and half to the right, use one from each pile. The seams will nest together. After you stitch two together, press seams to one
side.
Make 26 sets.
Make (4) light HST for each of the corners in the border. Cut (4) light squares 5-1/4" x 5-1/4" Place them right sides together. Draw lines just as you did in the prior step. Cut the HST apart. Trim to
4-3/4" x 4-3/4".
Now you are ready to layout your HST and blocks. If you have a design wall, use it. Blocks look so different when you lay them out on the floor. I suggest you take a picture of the layout, and if you have the capability, turn it into gray scale. You will be able to see the contrast much better in gray scale.
Alternate the direction that you press the seams. Press one row to the right, and the next row to the left so the blocks will butt up against each other.
The
quilt should measure 77” x 86”. There are a lot of seams in this quilt. If you are remotely close to the final size, be happy!
Here is an up close image of my machine quilting. I purposefully planned the layout with staggered blocks, so I could have a quilted line of feathers between the rows. I also quilted a tight stipple in the light areas of the blocks.
Here's the quilt on my long arm taken from the side of the quilt. It is so hard to get a good picture to highlight the machine quilting. In the zig-zag area, I used a golden thread color.
If any of you ever have a question, I'm just an email away. Here's my email address:
sewnwildoaks@gmail.com
I hope you enjoyed the tutorials. I would love to have you send me pictures of your blocks, and of course pictures of your finished Lil' Orphan Scrappy quilt!
Stay safe and healthy.
Soon,
Lynn
P.S. If you want to purchase the pattern, it is located HERE in my Etsy shop.


I'm still making my Ohio Stars. I agree about using a design wall. I could not make any kind of a decent quilt witout it. Your quilting is magnificent, Lynn!
ReplyDeleteThank you Sandy. I just took a peek at your blocks on your blog. I LOVE them!
Delete