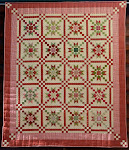
I got the borders on the new version of Madrigal yesterday. I decided to go with the green paisley from the Urban Cowgirl fabric line. Now it just needs to have the scalloped borders marked and she is ready for the quilting machine.....after I make the backing first.
Every sewing room needs to have an Easy Scallop tool by Darlene Zimmerman. Don't be hesitant to try a scalloped border. They are much easier than you think and it is so worth the little bit of extra effort to add a beautiful finish to your quilt. I used a blue Frixion pen for marking. Remember that you will always mark the quilt first before machine quilting. After it's quilted, it is time to trim along the marked line.
I set my scallop maker to 10 as that was the size that I calculated from the directions that came with the scallop. (Read and follow the directions on the scallop maker first!)
I could also cheat a bit on this quilt by aligning the scallop maker with the center of the setting triangle.
I marked a scallop on each side of the corner BEFORE I marked the corner curve. I opened up the scallop maker all the way to mark the corner. You have to really look for the blue line here to see how I drew in a gentle, curving line connecting the scallops.
While I was taking pictures of the new Madrigal, I realized that it was going to be hard for you to see the final markings. Here is where the re-run begins and I'm re-posting a post from Sept. 24th, 2010. At least you will be able to see the markings and have a better idea how to line up the scallops.
Have a wonderful weekend everyone. Don't forget the March Madness Shop Hop this weekend down at the shop.
As always,
Lynn
September 24, 2010
Yesterday I decided to scallop the border on Madrigal. Several years ago I purchased the EASY SCALLOP by Darlene Zimmerman. This product lives up to the name of Easy. It was so simple to follow the enclosed directions and mark the scallops on the quilt with a white Sewline marking pencil.
 I do not have a deep "V" between my scallops which will make the binding easier to apply.
 Marking the corners was a breeze.
 After I put the quilt on the machine, I made a running stitch along the drawn scallop line in a light thread. Next I stitched my "spine" for my feathers mirroring the scalloped line and stitched in some free motion feathers.
 Here is pass number two and three down the top of the quilt. For now, I'm planning on leaving the open area free of quilting in the setting triangles to see if I like it once the rest of the quilt in finished. It just may create a very interesting effect on the overall design. I always take digital photos while my quilt is on the machine so that I can refer back to the top. Because once I get to the bottom, I've forgotten just exactly what I did on the top! How many loops in the feathers? How many loops in the setting triangles?.....you get the picture! I'll roll up the quilt and start working on the individual squares today. No pantographs for me on this quilt! I'm pantograph challenged and each block deserves individual attention. All that individual attention will take me days and days....but it will be worth it.


Stunning!!! Thank you so much for all that awesome info, Lynn. Scallop border is on my to-do list. Actually, a lot of things are on that list! LOL! Great to know about the quilting on a scallop border in case I have a client that has one.
ReplyDeleteThe fabric you chose for your borders is just perfect ! Love that green :-D Thanks for the info for Scallop borders ! Just gorgeous quilting !
ReplyDeleteLynn this is going to be so beautiful. Will you quilt it the same as its older sister? Thanks for showing that quilt too, it really did make it easier to see the markings.
ReplyDeleteLove how the setting triangles look with the curved open piece. I never would have thought of that. It's going to be lovely!
ReplyDelete