


Hello Everyone,
This is Part One of my Lil" Orphan Scrappy quilt tutorial. There are a lot of pictures, so I'm breaking it down over a couple of posts.
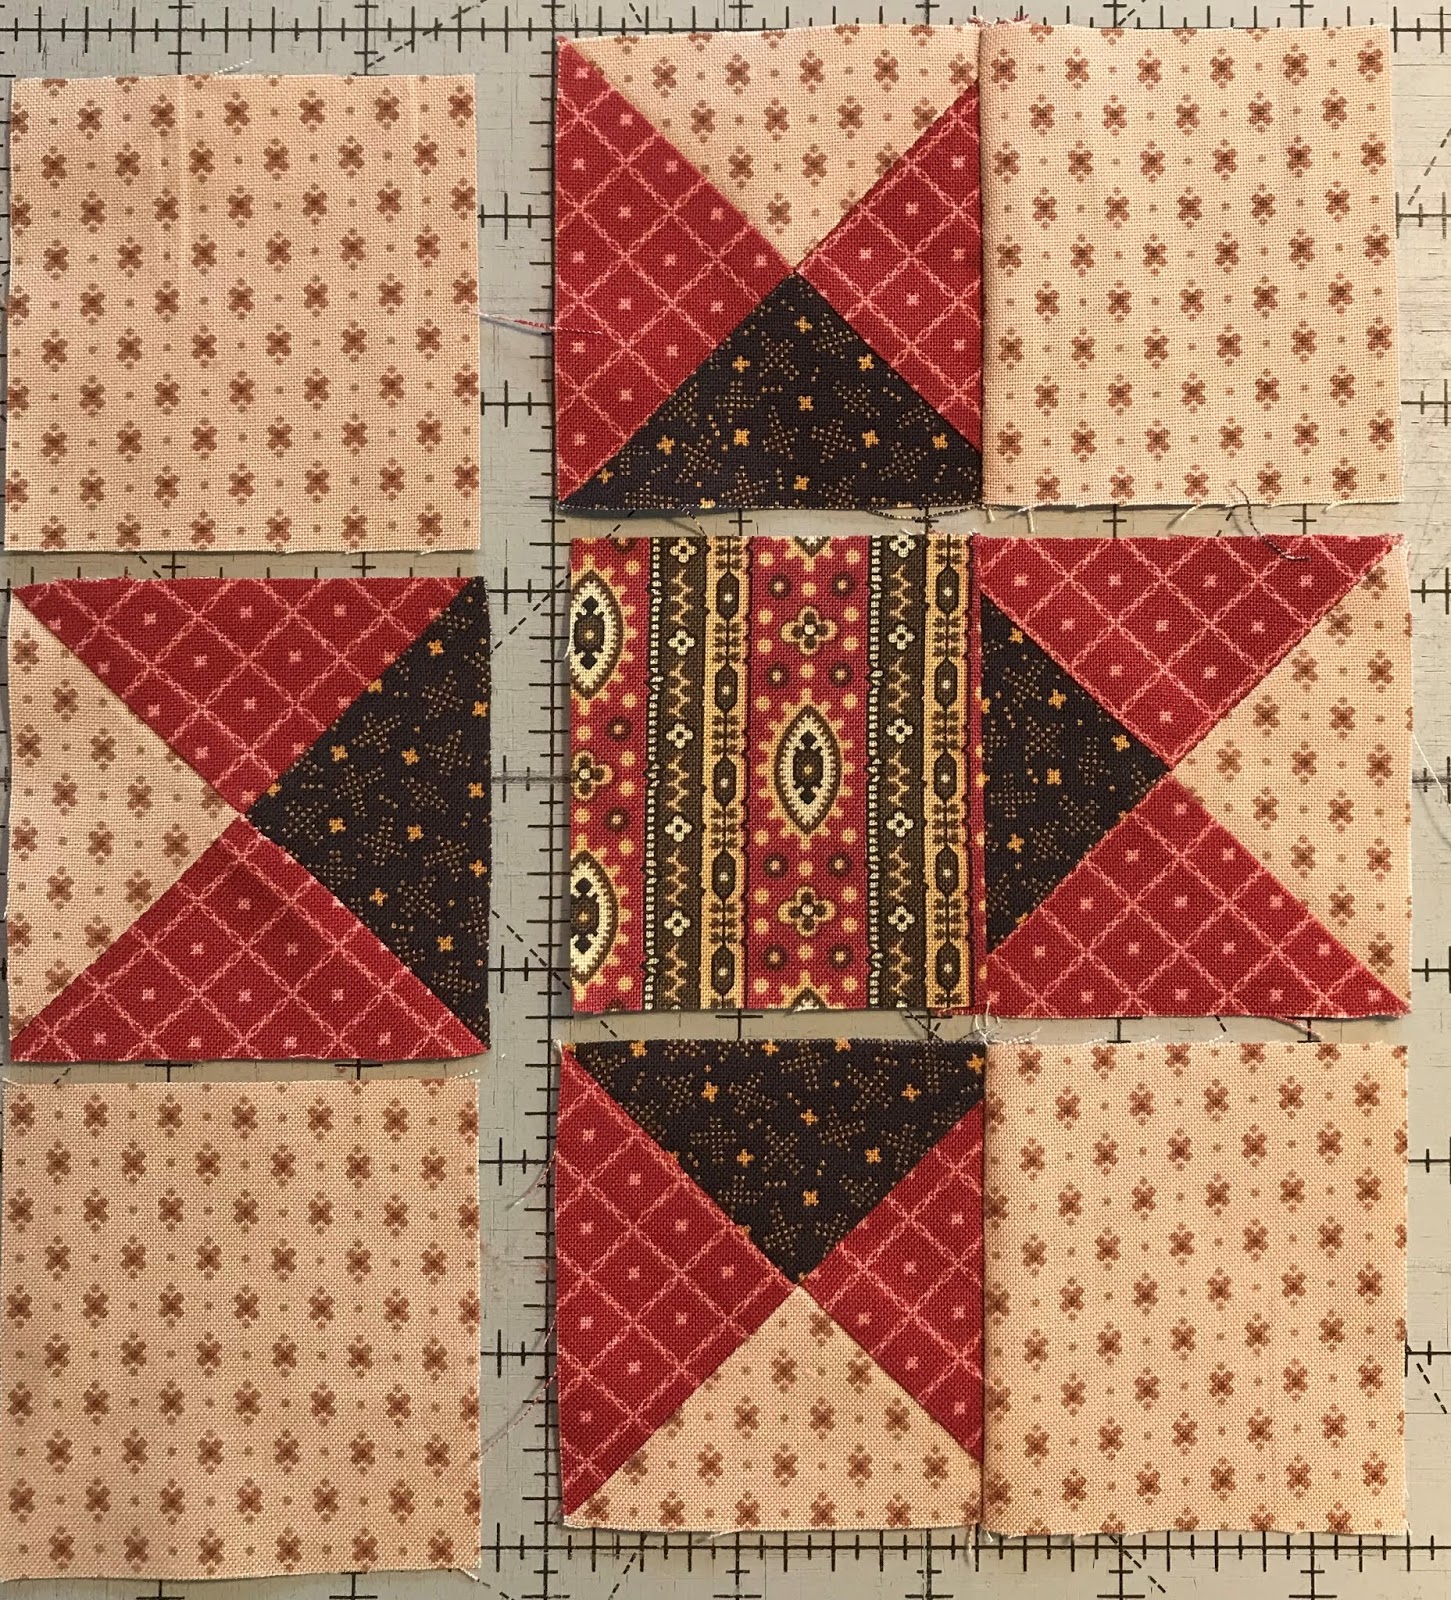
Begin with an interesting center. Key off of the colors in the center to help you select the fabrics. It is helpful to have at least three colors in your center square.

Schematic of the block.

" (1)
A 2-1/2” x 2-1/2” – Use an
interesting fabric that has several different colors
" (4)
B 2-1/2” x 2-1/2” – Light fabric, checks, stripes and
diagonals are good
" (1)
C 3-1/4” x 3-1/4” – Medium/Dark fabric
" (1)
D 3-1/4” x 3-1/4” – Light fabric (This can be the same fabric as B)
"  (2)
E 3-1/4” x 3-1/4” – Dark fabric
(2)
E 3-1/4” x 3-1/4” – Dark fabric
(2)
E 3-1/4” x 3-1/4” – Dark fabric
Place the two "E's" face up on a cutting surface.

Place a "C" and a "D" on top of the "E's" Right sides together.

I use a small
Omnigrid™ ruler that has a centerline ¼” from both sides of the ruler. Place the ruler diagonally on the wrong side of the fabric and draw
a line on each side of the
ruler using a marking pencil. I use a very fine, Frixion pen for marking.


If you don't have a 1/4" ruler, draw a diagonal line from corner to corner. Stitch 1/4' from each side of the line.

Stitch on the line. Or stitch directly on the inside of the line, closest to the center line, if you tend to run small. Begin with your needle down, and have the fabric touching the needle.

Cut apart between the stitching lines.

You will have (4) half-square triangles.

I run a line of Best Press spray starch along the stitching line. You can also use a brush to apply the starch. This helps to keep the components nice and flat.

Press toward the "E's".


© Place
the half-square triangles on top of each other, right sides
together. Draw a diagonal line perpendicular to the seam allowance from corner to corner Make sure to ‘butt’ the two seams together and pin to secure

Peel the top back to make sure the seams and the placement are accurate.

Mark and stitch on the lines.

Cut them apart.

I gently pull the seam back and remove about 3 stitches.

I turn the unit over and do the same thing on the other side.

Apply spray starch along the thread line. I guess I was feeling a little woozie here with my wavy line!

Press it like this. The back is nice and neat and is very flat.


Trim to 2-1/2" x 2-1/2" and cut off the dog ears. (Don't let Mazey hear me say that!)

I you are working with directional fabrics, make sure it is all going in the same direction.

Pin, stitch press toward the squares.


Now stitch the rows together.

Have your needle pass through the intersection of the previous seams.


Square to 6-1/2" x 6-1/2"

Here are some other color combinations. There are endless possibilities.

Make a few blocks and see how it goes. I'll be posting a continuation of this tutorial later this week. If you would like to purchase the pattern which contains more, detailed instructions, it is available HERE in my Etsy shop.Thank you all for the get well wishes. I'm feeling better this morning, but I'm not ready to run a marathon.....or the 50 yard dash.....or a 10 yard dash. Now if one of the bears we have around here was after me, that's a different story!
Soon,
Lynn
Your quilt is beautiful and I love all those scraps. Great tutorial too!
ReplyDeleteThank you so much Deanna. I appreciate your comment. Lynn
DeleteThanks Lynn!!!!
ReplyDeleteHappy you are feeling better...
You are welcome Paula. I'm happier now that I'm feeling better too!
DeleteAnother gotta have!!!!!
ReplyDeleteThank you Nanette. Your order will ship this afternoon. Thank you for your note too. Oh my, you have a lot on your plate! Stay safe, Lynn
DeleteLynn, I'm chomping at the bit to get started on this! I'll be working mainly from scraps, so I'm thinking I should save my larger scraps for the four large triangles surrounding the star. I'm probably getting ahead of myself, but what size scraps should I be looking for, for those? ps I love your little tips to ensure precision!
ReplyDeleteHi Sandy. The largest scrap you will need is 5-1/4" x 5-1/4" for the large triangles. This quilt is a great quilt to incorporate a lot of scraps. Stay safe, Lynn
DeleteYour use of fabric and color is fabulous. Thanks for sharing this quilt with us and all the tips.
ReplyDeleteYou are very welcome Jacqueline!
DeleteThank you for the tutorial. I dont have a starch pen, but thinking it might be OK to just starch my fabric before I cut the blocks.
ReplyDeleteThat should work too, Sue. I mainly put the starch on the stitching line to get the seam to lay flat.
DeleteI am glad that you are feeling better and eating lots of Sour Dough Bread. I was so happy when you posted about Little Orphan Scrappy, I have tons of scraps and have already made 19 blocks and more to go, can't wait for Part 2. The tip with the starch pen is great, I have two of them and they are getting a work out! Thanks again for sharing your talents.
ReplyDeleteWow.....19 blocks already! You've got me beat. I'm working on the tutorial as we speak, and should be able to post part 2 over the weekend. Stay well.
DeleteThis comment has been removed by a blog administrator.
ReplyDeleteThis comment has been removed by a blog administrator.
ReplyDelete