Showing posts with label Bridle Path Tutorial. Show all posts

Friday, December 8, 2023

Month #4 Bridle Path Tutorial

 Hello Everyone,

I've been doing a bit of fighting with Google Docs and I think I finally made this document accessible on that platform, so you can easily print out this tutorial.  Click HERE to access the tutorial.


First of all, on Page 10 of your pattern, change the size of the plaid Piece B to 7-1/2" x 7-1/2".  The 6-1/4" x 6-1/4" will work, but you will not be able to line up your plaids as well.

Now, begin cutting your parts and pieces out for the interior of the blocks on page 11.  The pieces are shown below.  Using an Omnigrid or Fons and Porter 1/4" ruler, mark the stitching line on each of the lighter fabrics. You will be making HST with these pieces.


Stitch directly on the line, or just inside the line toward the center if your components tend to run too small.

You will now have (4) HST which look like this.  Press toward the dark fabric. No need to trim just yet.


Place a light/black HST on top of a blue/black HST.  The seams will butt up to each other.


I like to use a 1/4" and mark on each side of the ruler using a fine point Frixion pen.  Stitch directly on the lines.

Twirl the seams to reduce bulk.


Trim the required measurement at the top of page 32.  


The back of the block will look like this after you stitch the rows together.


I'm finding that I'm pressing more and more of my seams OPEN to reduce the bulk.  


The unfinished block measurement is on page 32.


Now I'm going to talk about cutting and adding the plaid triangles around the block.

The 6-1/4" x 6-1/4" will work as stated on Page 10 of your directions.  But your block will look more like the picture below.  Some quilters don't care if the plaids aren't matching, and that's fine.


If you want your plaids to match, cut a plaid square 7-1/2" x 7-1/2".  Follow my directions below, and the block will like more like this picture.

Working with a 7-1/2" x 7-1/2" plaid square, align the 45 degree line on your ruler to a line in the middle of the fabric square.


Now you are going to have to do some trimming around the square to get it to the 6-1/4" x 6-1/4".  Your ruler will be a little wonky on top of the square because the plaid wasn't printed at an exact 45 degree angle.  This is why I cut each of my squares one at a time.


Trim the square to 6-14/" x 6-1/4".  

Cut in like this and place them around the complete block as shown on page 11 of your pattern.


Stitch two opposite sides on, press toward the plaid.  Then sew on the other two sides.


Trim to the measurement on page 11 of your pattern.


For the red, follow the directions on page 10 of your pattern.  Cut the red square diagonally only ONCE.

I'm sure you will find that these blocks are a lot easier than the star blocks.  Be creative with the colors you use in the inside of the block.  If you don't like a combination that I suggested, then create your own.

If you ever have any questions, I'm just an email away.

Soon,
Lynn    


Friday, September 1, 2023

Bridle Path Tutorials

 Hello Everyone,

It's September 1st, and many of you have your first monthly installment to make your Bridle Path quilt. All shops are starting at different times, so don't be alarmed if your package hasn't arrived yet.


For the next three months, you will be making the center star blocks.  Take your time, cut accurately, and have an exact 1/4" seam.


By the 5th of the month, I will be posting the first chapter of my short story about my fictional Pack Horse Librarian.  It's been fun writing about her travels and exploits while delivering books into the hollers of Kentucky.  Mr. Joe and offered his 2 cents to the story.

The tutorials are located at the top of the blog and will be available for years to come, so don't worry if you don't get started on the quilt right away.


Soon,
Lynn


Monday, July 17, 2023

Bridle Path Star Block Tutorial

 Hello Everyone,

I finished the first tutorial for Bridle Path and posted it in Google Docs so it will be easy for you to access and print.


Click HERE where you can download the tutorial.  I will also create a tab at the top of the blog at some point in time so you can always have it at your fingertips.


The tutorial includes step by step instructions to make the main star block.  If you've been on the fence about signing up for the quilt, take a look at the tutorial.  I break the block down to the smallest components and walk you through the process step by step.


This week, I'll work on the tutorials for the next set of blocks and the cabins.

It has been suffocatingly hot here in the mountains of Northern California.  I open up the cabin at 5am and turn on the ceiling fans to suck in cool air.  We've been closing it up around 10am to keep the heat out.  We don't have air conditioning, so it can get quite toasty hot inside.

I've been working outside on my computer in the early morning hours. I love listening to the melody of the mountain....the birds.  It's better than any music available.  I love watching their antics and family dynamics at the bird feeder.


There are days when I'm the first one in the pool at 7:45am to swim laps with my kick board then transition into water aerobics at 8:30am.  I'm feeling stronger and have more endurance each day.  The water aerobics also helps with balance.  This is the best exercise EVER and I miss is sooo much during the winter.  The water is going to feel so good this morning.


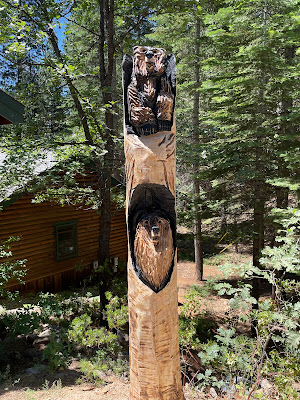
In the name of fire prevention, our utility company came through our neighborhood and cut down hundreds of trees that threatened the power lines if they came down in a storm.  We had a beautiful tree by our driveway which we loved, and we were sad to see it go.  We asked the workers if they could leave a 9' section of the tree so we could have a totem pole.  We hired a chainsaw artist to carve it for us and he finished last week.  


I've been re-reading the Clan of the Cave Bear Series as I enjoyed them so much when they first came out a couple of decades ago.  So now, this cabin has a strong cave bear totem.  I actually think the lower bear looks like Mazey which is perfectly fine with us.

Our chainsaw artist has a good story about how he turned his life around.  He was homeless and saved bottles and cans to purchase his first chainsaw.  He now has his own place and sells his chainsaw art around different mountain communities.  He calls his company Faith and a Chainsaw.  He's a wonderful and very personable young man.  

I hope you have an enjoyable day and week.  It's full steam ahead here at Wilder's Last Resort for retreat preparations, tutorials, and projects that need to be completed.

Soon,
Lynn