Thursday, April 2, 2020

Moda Blockheads Block #12

Hello Everyone,
 
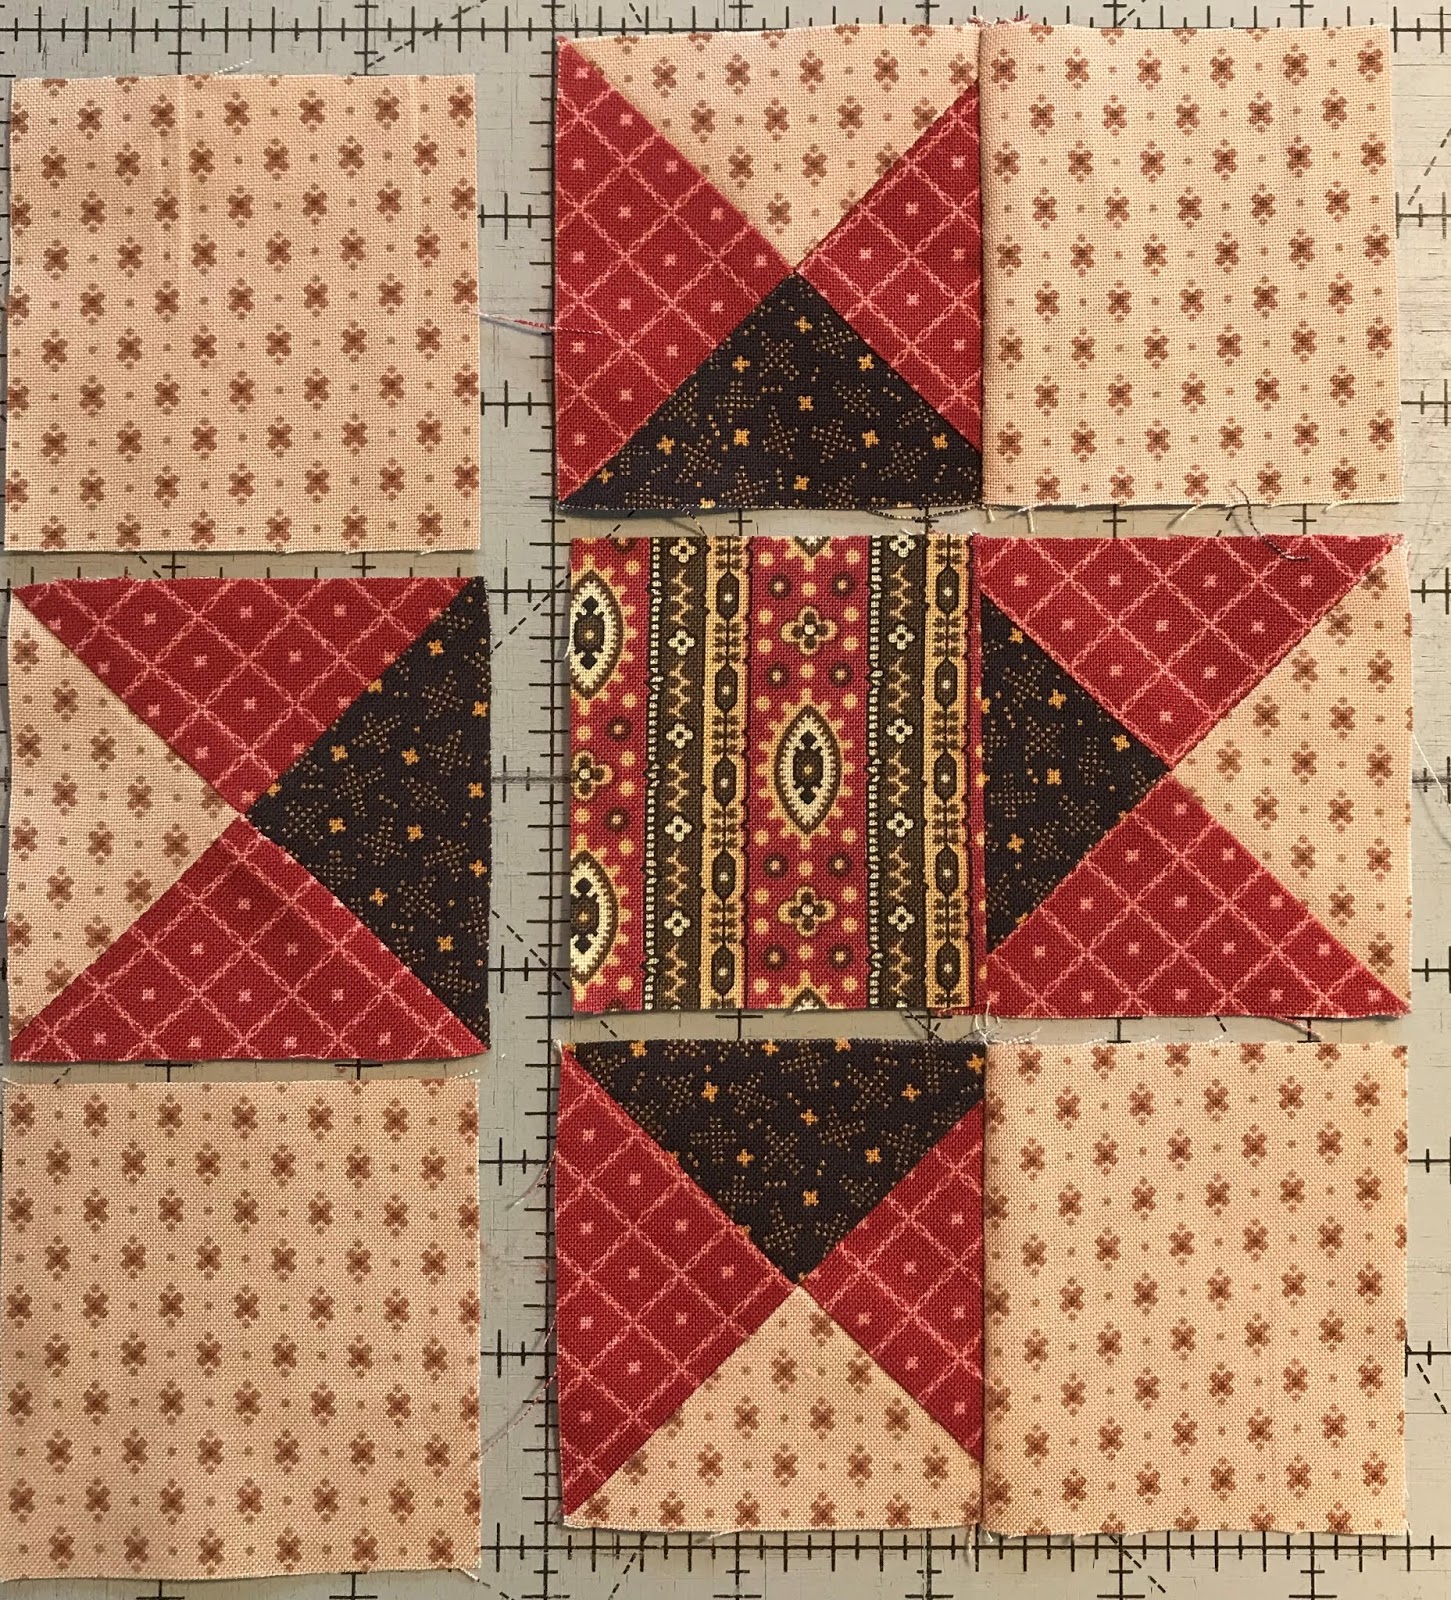
I'm back on the Moda Blockhead bandwagon.  This block was introduced by Janet Clare for Moda.  Janet featured several different layouts on her blog.  My block will finish at 8" and I'm only using fabrics by Betsy Chutchian for Moda.
 

I made my components and then started playing.  Instead of making a ton of half-square triangles, I made Flying Geese. This eliminated so many extra seams in the block.  If you click on my Virtual Classroom at the top of my blog, you can see how I make my HST and Flying Geese. 


I make my HST 8-at a time, which is so much easier than making them one at a time.  I make my Flying Geese 4-at a time.  If you want to see videos of how I make these components, you can watch my videos for FREE on The Quilt Show by clicking HERE.  In the videos I go over the formulas so you can make the components any size you want.  My HST finish at 1" x 1".  My Flying Geese finish at 1"x 2".  I made a Square in a Square for the center instead of making 4 HST.  The construction method, and formulas are in my videos or in my Patchwork Math book.

 
I can see an entire quilt made with this block.  The hardest part is deciding what fabric goes where.
 
I was off of the Blockhead bandwagon for a couple of weeks because the blocks were simplistic.  The intricacies of this block intrigued me, and I knew it was a perfect fit with the rest of my blocks. 
 
To get this block together, I started at the top row.  I stitched the solid square to the HST.  Then I pressed before I stitched the other solid block on.....and sew forth.  Stitch, press, stitch, press.  Don't wait until you get the entire row together before pressing. Before I pressed, I used my special pen filled with Best Press, and put starch along the thread line. I pressed with a dry iron.


This is self-isolation day 18 for us.  Thank God our governor implemented this early in California.  I sincerely believe his early, decisive actions have helped contain the virus, and has saved lives in our populous state.  Yes, we have a lot of cases, but it could be so much worse.

I look forward to the day when we can all be together in our quilting groups, laughing and hugging.  That day will come, we just need to be vigilant now, and stay put in our homes!

Soon,
Lynn

Tuesday, March 31, 2020

Lil' Orphan Scrappy Tutorial Part One

Hello Everyone,
 
This is Part One of my Lil" Orphan Scrappy quilt tutorial.  There are a lot of pictures, so I'm breaking it down over a couple of posts. 
 
Begin with an interesting center.  Key off of the colors in the center to help you select the fabrics. It is helpful to have at least three colors in your center square.


Schematic of the block. 
Cutting Instructions:

" (1) A 2-1/2” x 2-1/2” – Use an interesting fabric that has several different colors
" (4) B 2-1/2” x 2-1/2” – Light fabric, checks, stripes and diagonals are good
" (1) C 3-1/4” x 3-1/4” – Medium/Dark fabric
" (1) D 3-1/4” x 3-1/4” – Light fabric  (This can be the same fabric as B)
" (2) E 3-1/4” x 3-1/4” – Dark fabric


Place the two "E's" face up on a cutting surface.


Place a "C" and a "D" on top of the "E's" Right sides together.


I use a small Omnigrid™ ruler that has a centerline ¼” from both sides of the ruler.  Place the ruler diagonally on the wrong side of the fabric and draw a line on each side of the ruler using a marking pencil.  I use a very fine, Frixion pen for marking.


If you don't have a 1/4" ruler, draw a diagonal line from corner to corner.  Stitch 1/4' from each side of the line.


Stitch on the line.  Or stitch directly on the inside of the line, closest to the center line, if you tend to run small. Begin with your needle down, and have the fabric touching the needle.


Cut apart between the stitching lines.


You will have (4) half-square triangles.


I run a line of Best Press spray starch along the stitching line.  You can also use a brush to apply the starch.  This helps to keep the components nice and flat.


Press toward the "E's".


©      Place the half-square triangles on top of each other, right sides together. Draw a diagonal line perpendicular to the seam allowance from corner to corner  Make sure to ‘butt’ the two seams together and pin to secure   


Peel the top back to make sure the seams and the placement are accurate.


Mark and stitch on the lines.


Cut them apart.

I gently pull the seam back and remove about 3 stitches.

 
I turn the unit over and do the same thing on the other side.


Apply spray starch along the thread line. I guess I was feeling a little woozie here with my wavy line!


 Press it like this.  The back is nice and neat and is very flat.


Trim to 2-1/2" x 2-1/2" and cut off the dog ears. (Don't let Mazey hear me say that!)


I you are working with directional fabrics, make sure it is all going in the same direction.


Pin, stitch press toward the squares.


Now stitch the rows together.


Have your needle pass through the intersection of the previous seams.


Square to 6-1/2" x 6-1/2"


Here are some other color combinations.  There are endless possibilities.


Make a few blocks and see how it goes.  I'll be posting a continuation of this tutorial later this week.  If you would like to purchase the pattern which contains more, detailed instructions, it is available HERE in my Etsy shop.

Thank you all for the get well wishes.  I'm feeling better this morning, but I'm not ready to run a marathon.....or the 50 yard dash.....or a 10 yard dash.  Now if one of the bears we have around here was after me, that's a different story!

Soon,
Lynn


Sunday, March 29, 2020

Lil' Orphan Scrappy Tutorial

 Hello Everyone,

I've been down for the count for the last 4 or 5 days with a horrible, upper respiratory event.  Mr. Joe and I weren't practicing good social distancing, and I caught what he had.  Now it's his turn to take care of me. 

 
Last week, before I was totally knocked off my feet, I posted this picture of  Lil' Orphan Scrappy on Scrap Quilt Enthusiasts on FaceBook, and it took off! This is a great quilt to make with all of the little scraps you are finding as you clean out your sewing rooms.  The largest piece of fabric you need is 5-1/4".  We ALL have a carload full of scraps that size...and smaller.


Over the next few days, I'll be putting a tutorial together for this quilt.  It really is fun, and it isn't hard to make.


I'll be sharing tips to get your stripes to line up.  Actually this block was a fluke, but you don't know that.


So check back in throughout the coming week for multiple tutorials.  I don't want to overextend myself until I'm completely out of the woods. Right now at least I can see through the trees.


I do have a recommendation for those of you that have Netflix.  Mr. Joe and I watched the 6-part, true story called The English Game.  The show is a worthwhile investment of your time. 

My daughter had me laughing the other day on the phone.  Those of you who've been following me know my granddaughters are very involved in FFA.  Together, the girls are raising four pigs, two goats, and five turkeys.  The pigs and goats are at the school farm.  Normally, the turkeys are kept at the school in the FFA area.  Well, the school is locked up tight.  The turkeys are living in my daughter's garage.  No matter how clean the girls keep the enclosure, there is still an odor....and they are noisy.  My daughter is planning on a very early Thanksgiving this year if the school doesn't open soon.  At least they will have food!

Gobble, gobble,
Lynn