Hello Everyone,
While we are spending more time at home, quite possibly in our sewing rooms, let's learn a new technique to add to our quilting toolbox......the Dresden Plate block. My blocks are a little different because I'm combining Fans and Blades. The Blades are the "pointy" bits, and the fans are rounded.
This is the block I'm making using Far Horizons fabric by David Schulz for Henry Glass Fabrics. Begin by selecting three fabrics that look gorgeous together. With this fabric line, they all look gorgeous together!
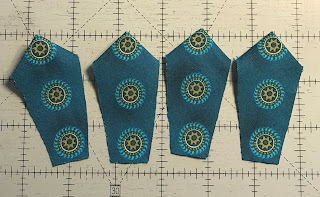
According to my pattern called Spoken For, I made templates out of template plastic. I LOVE the gridded template plastic. I like to make my templates out of plastic so I can see the underlying design for fussy cutting. In this picture, you can see that I outlined four blades on the wrong side of the fabric.
I fold them in half, right sides together and pin.
Then stitch 1/4" from the wide, top of the blade.
Clip the inside corner off along the folded side.
Press the seam open.
Use a little pointy thingy and turn the blade inside out. Press.
And then there were four.
Now we make eight fans. Use your template made out of plastic, and fussy cut the fans.
With this template, make a freezer paper template. This is where my method differs from the norm. Mr. Joe always tells me I'm not normal!
Iron the freezer paper template to the wrong side of the fan.
Clip the fabric right to the paper template.
I used a Clover, fabric folding pen filled with Best Press, and applied a little bit of starch to the exposed fabric. You could also use a small brush to apply the starch.
I used an iron, and pressed the fabric over the template.
Remove the template and it looks like this. Do this procedure on all the fans.
The fans are going to be placed right next to the prepared blade.
Pin the pieces together.
Start stitching at the skinny end. Before I start stitching, I move my needle one notch to the left. I stitch about halfway, and move the needle back one notch. This procedure helps gather the center area together. You can see that my stiletto is pointing to where I moved my needle back to its normal position.
Another little tipsy is to apply a thin, line of Best Press directly on the thread. This also helps in the final construction and makes the seams flat.
You can't tell my needle was moved over a notch the first half of the stitching. This will ease the center area down.
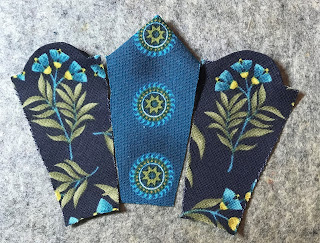
I think these fabrics look great together.
Now I do the same procedure with the fans.
I lay all of the parts and pieces together, and continue stitching the seams together.
I fold my background fabric into quarters, and lightly press. This helps me line up the Dresden Plate onto my background. Then make the center hexagon out of the same fabric used for the blade. At this point, I hand applique the plate to the background. You could also machine applique the block to the background fabric.
I find the application of the Best Press directly to the thread line, and moving the needle over a notch, make the block flat. In the past when I made this block, the center area looked like a square dancers ruffly skirt! Do you know what I mean? I used to starch the block into submission with heavy duty spray starch. Now I don't need to do that.
I have a lot more blocks made now, but I don't have a picture to show. I only have to make one more block. I may be far enough along to get a good picture later on.
Stay safe and hunker down. We are self isolating at the cabin. We are already quite isolated, so this is nothing new for us. We couldn't get more isolated if we tried!
Soon,
Lynn


Your tutorial really does have some unique (like you :-) steps in it. Thank you for the tips to help with construction.
ReplyDeleteThank you for calling me unique Loris. It sounds so much better than not normal....
DeleteThat made me giggle - felt good to giggle1
DeleteYou stay safe Fran!
Deletethat is how I did my pointy blades for the quilt that is on my quilting frame now - I like seeing how you did the rounded blades.
ReplyDeleteMost techniques for the fans showed me to do a needle turn applique. That method just didn't work for me.
DeleteThanks for this tutorial. We are quite isolated here as well, so self-quarantine will not be an issue if it comes to that. Until we run out of TP that is.
ReplyDeleteLast Friday our little store had TP. So far so good here.
Delete