Hello Everyone,
I spent yesterday preparing for two upcoming workshops in May on Patchwork Math. The first workshop is for the Piecemakers Quilt Guild in Fremont, and the second is for the Valley Quilt Guild in Yuba City. I received an email from a reader who asked me, "What is Patchwork Math?" So while I prepared some new samples for class, I thought I would take pictures, and briefly explain the process.
In my supply list, that I provide before each class, I recommend at least 12-18 coordinated fat quarters. I'm using a beautiful palette of fabrics from Marcus Fabrics called Past Endearments by Judie Rothermel.
I decide ahead of time what size block I wanted to make. In this case, my end goal is a 9" block. I refer to the formulas in my Patchwork Math book, and began making components. At this point in time, I have no idea what my blocks are going to look like, but I know they are going to be beautiful!
I made four, double flying geese. The unfinished size is 2" x 3 1/2". When sewn into a block, they will measure 1 1/2" x 3". I also made four, squares in a triangle. The unfinished size is 3 1/2" x 3 1/2". The finished size will be 3" x 3" once it is sewn into the block. When using the formulas, you ALWAYS begin the finished size in the calculation. Remember, begin with what you want it to measure. There are formulas and piecing techniques for 12 components in the book. I made only a few of them in the following examples.
Here are four, quarter square triangles and four regular flying geese.
I posted a tutorial HERE, in my Virtual Classroom section, quite some time ago showing how I make half-square triangles 8 at a time. It also includes a handy reference chart. Unfinished, they measure 3 1/2" x 3 1/2".
Then I made some squares in a square and more geese. I also made a few other components just to have more to work with when I start designing blocks. But, here is an important point.....you can also use any of the components in sashing or borders. All you need to do is calculate the size by using the formulas in the book. You don't have to worry about the pesky seam allowance, since it is already calculated into the formula.
Once I made my components, I started to play. The following two blocks have the exact same components in them....they've just been rearranged to make a completely different look.
Now I added the square in a triangle component, and look at the difference this creates.
Now I just rotated the square in a triangle for another, completely different look.
Since all of my components measure either 3 1/2" x 3 1/2" or 2" x 3 1/2", they fit together like puzzle pieces.
Now through the magic of computers, I can enlarge a block with the computer and pretend that I have the start of a medallion quilt. It is so easy to re-size all of the components and create an 18" block or a 4" block. Your imagination is your only limitation.
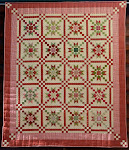
Or, I can do something like this. Just add sashing and a border, and I'm good to go for a whole new design. You know me though......I have to include every piece of fabric from the whole collection to achieve my scrappy look.
Here's an example of using the square in a square component as a decorative sashing to only one side of a block. The finished size of the block is going to be 10". So I made 5, 2" x 2" squares in a square. I love this block!
It's playtime again today. This isn't work......it's all play. Go play today, either outside or inside. Just have fun!
Soon,
Lynn


I love how you play with the blocks. So fun
ReplyDeleteLove your vase with Dresden blades. Gorgeous line of fabric for your class quilt.
ReplyDeleteYou make it sew easy! Which reminds me that I need finish what I started in class. I'm surrounded by UFOs.
ReplyDeleteI think I will take your advice and do some playing today. My first order of business is to put some borders on a quilt I'm finishing; playing afterwards will be the reward I give myself! Thanks for the explanation of your quilter's math; even this old English teacher gets it!
ReplyDelete